Rasterization (I): Overview
Introduction
As I mentioned in my first post when I introduced rendering, there are two ways to solve the visibility problem: Ray tracing or Rasterization. In this post we’re going to focus on the latter one.
This is the first post of a series about Rasterization:
- Rasterization (I): Overview (this post)
- Rasterization (II): Projection (TODO)
- Rasterization (III): Containment (TODO)
- Rasterization (IV): Depth buffering (TODO)
- Rasterization (V): Attributes interpolation (Bonus) (TODO)
- Rasterization (VI): Final result (TODO)
Rasterization: Overview
Rasterization and Ray Tracing are processes that take a 3D world as an input and generate an 2D image as an output. These 2D images correspond to a specific view of the 3D world where the camera is placed. The difference between these algorithms is how they work to produce the result.
In the case of Rasterization, we take the vertices of a 3D object (usually a triangle) and we project them into the screen creating a 2D object.

Then we iterate all the pixels in the screen and we check if the pixels are contained inside this 2D object. If they are, we color them.
![]()
The pseudocode of this algorithm looks like this:
Image rasterizer(const World& world) {
  /// Array of colors
  Image image (width, height);

  for each triangle3D in world {
    Triangle2D triangle_projected = camera.projectTriangle(triangle3D);
    for each pixel in screen {
      if (triangle_projected.contains(pixel) {
        image[pixel] = triangle3D.color;
      }
    }
  }

  return image;
}
It’s worth recalling that in the Ray Tracing algorithm, we first iterate pixels and then we trace a ray from each pixel to each object. On the contrary, in the Rasterization algorithm, we are first iterating the objects and then the pixels. For this reason, the Rasterization process is known as object centric.
For now, the process is very simple. We just need two functions:
- ProjectToScreen. Projects a 3D object into a 2D object in the screen
- Contains. Returns true if a point is inside an object.
This two functions, and in general, all functions, are easier to define for the triangle primitive. For this reason, in graphics we always work with triangles. It’s the simplest form to work with and we can combine them to create more complex forms.
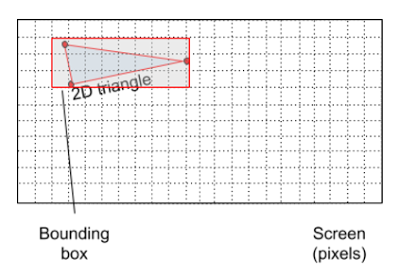
Simple optimization
It’s quite stupid to iterate all pixels every time we want to render a triangle. We know that only a small portion of the pixels will be colored. A very simple to discard pixels and speedup this process is using a bounding box. We can create a bounding box around the projected triangle so that we only iterate those pixels inside the bounding box and not all the pixels of the screen.
This is a small change in our previous code:
Image rasterizer(const World& world) {
  /// Array of colors
  Image image (width, height);

  for each triangle3D in world {
    Triangle2D triangle_projected = camera.projectTriangle(triangle3D);
    BoundingBox2D bbox_projected = calculateBBox(triangle_projected);
    for (x = bbox_projected.min.x; x <= bbox_projected.max.x; ++x) {
      for (y = bbox_projected.min.y; y <= bbox_projected.max.y; ++y) {
        Pixel pixel(x, y);
        if (triangle_projected.contains(pixel) {
          image[pixel] = triangle3D.color;
        }
      }
    }
  }

  return image;
}
The code now includes a new function calculateBBox but it’s still very simple.
Depth buffering
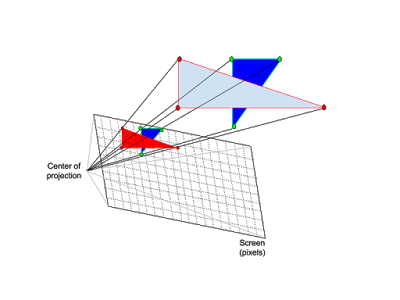
A clever reader may be wondering what happens when two triangles overlap on the screen? The solution it’s quite simple and intuitive. The idea is that, when we project our triangles into the screen, we will store a depth-value (or z-value) for each pixel. This value determines the distance from the 2D screen pixel to the nearest 3D triangle. Now, when two (or more) triangles overlap, is very easy to know which one should be displayed: the one with the smaller depth value, because that means that is closer to the screen.
In the example image we have a blue dark blue and cyan triangle. Because the dark blue triangle is farther from the camera: depth1 < depth2 the cyan triangle should be displayed in the screen.

With this small modification, we have now the final pseudocode for our Rasterization algorithm:
Image rasterizer(const World& world) {
  /// Array of colors
  Image image(width, height);
  /// Array of distances
  DepthBuffer depth_buffer(width, height);

  for each triangle3D in world {
    Triangle2D triangle_projected = camera.projectTriangle(triangle3D);
    BoundingBox2D bbox_projected = calculateBBox(triangle_projected);
    for (x = bbox_projected.min.x; x <= bbox_projected.max.x; ++x) {
      for (y = bbox_projected.min.y; y <= bbox_projected.max.y; ++y) {
        Pixel pixel(x, y);
        if (triangle_projected.contains(pixel) {
          float depth = calculateDepth(triangle3D, triangle_projected, pixel);
          if (depth < depth_buffer[pixel]) {
            depth_buffer[pixel] = depth;
            image[pixel] = triangle3D.color;
          }
        }
      }
    }
  }
  return image;
}
As you can see, along with some extra conditions, there’s an extra function now calculateDepth to get the depth value of a specific pixel.
Putting it all together
In this post we’ve seen the main idea behind of the Rasterization algorithm. We should be able to identify the basic needs of this algorithm in order to work:
- 3D world made up of triangles that we are going to render from a specific pont of view.
- A Camera that determines there is specific point of view is and how the “picture” is taken.
- A projection function to project the 3D triangles into the screen as 2D triangles.
- A contains function to check if a pixel is contained inside a projected 2D triangle.
- A bounding box function to discard pixels that we are sure won’t be contained in the 2D triangle.
- A depth function to determine which triangle we should display when there is an overlap.
Aaaaaaaaaand that’s all. In the next post we’re going to implement the projection function.