OpenGL setup in Visual Studio 2015
Introduction
Every time that I have to setup an OpenGL project is a pain in the ass. Compiling and linking all the headers, libraries in the correct order with the right dependencies…it just never works.
For this reason, I decided to make the simple post about how to easily setup an OpenGL project with the essential dependencies in a Windows platform using Visual Studio.
Note: In fact, it is easier to setup an OpenGL project in Linux using a cmake file.
Dependencies
First of all, let’s wee which are the dependencies of our OpenGL project:
- Glew is used to load the functions of the OpenGL API in runtime for the target platform.
- GLFW is used to manage the windows system, mouse and keyboard events and so on.
- GLM (optional but recommended) is a mathematics library (vectors, matrix multiplications…)
- Assimp (optional but recommended) or Open Asset Import Library is used to load assets in very different formats into our program.
- SOIL (optional but recommended) stands for Simple OpenGL Image library for loading images or textures into our program.
Of course you are free to choose a subset of these libraries or any libraries you want depending on your requirements.
Required files
Now we know which libraries we need, but, which files? In order to be able to compile and link the libraries with our OpenGL project we need usually two things:
- Header files. The header files specify the declaration (signatures) of functions, classes.but they don’t include implementations of functions except for inline functions. This is for compilation.
- .lib files. If in the header files we have the declaration, here we have the definition of the functions. Is where the actual implementations of functions are. This is for linking.
Note: some libraries like GLM are header only libraries. That means that there are .lib files. All the code is in the headers file (using inline functions).
So far, so good, but, how do we get these files? In the download section of most libraries there are usually two different options:
- Source code. This is the source (.h and .cpp files) of the library. The headers files are usually under the include/ directory but to get the .lib files we must setup, compile and build the project to generate the .lib files. Some libraries come with makefiles, cmake files or already created projects in Visual Studio, Codeblocks or Netbeans to speed up this process. However, it tends to be very error prone.
- Binary libs (32 / 64 bits). These is the source code already compiled for Windows platforms. This can save us time because we don’t have to setup the project, compile and build the libraries since it has been done for us. The only thing that we need to do is look for the include/ directory and the .lib files. This is the preferred way to Windows users.
Now that you know this you can proceed to download the libraries in the way you want as long as you end up with the headers file and the .lib files because we’re going to need these to set up the project in Visual Studio.
Note: the version 3.1 of Assimp has a bug for Windows so use the version 3.0.1 instead (see github issue)
Visual Studio project
First of all, let’s create an empty project of type Win 32 Console Application.
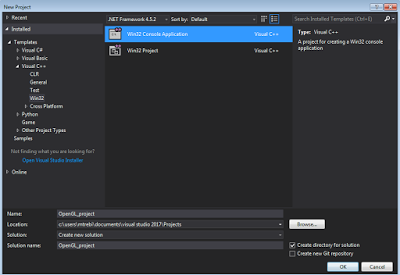
After clicking OK the Win 32 Application Wizard will open. Click Next >, select Empty project and then click Finish.
Visual Studio dependencies
Now we’are going to add the dependencies of our project. To do so, click on the Project > Properties.
Make sure that the Configuration is set to __All configurations in order to setup the dependencies for all type of configurations.
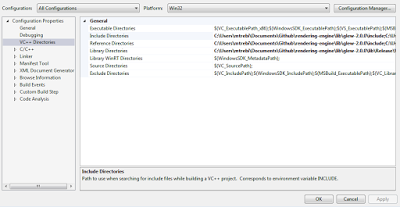
Then, on the left menu select VC++ Directories. These are the paths where our project searches for code to compile and link:
Open Include Directories to include all the headers files of our libraries. Mine looks like this:

Open Library Directories to include all the lib files of our libraries. Mine looks like this:

Notice that there is no lib file for GLM library (since as I said is a header only library).
Now, navigate on the left menu to select C/C++ > General and modify Additional Include Directories to look exactly as the previous Include Directories.
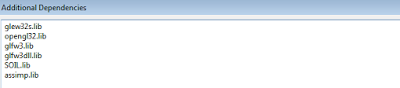
Finally, select on the left menu Linker > Input and change Additional Dependencies to look like this:
Visual Studio includes
One important thing is to add this to your code before anything else:
// GLEW
#define GLEW_STATIC
#include <GL/glew.h>
All other includes work as usual:
// GLFW
#include <GLFW/glfw3.h>

// Simple OpenGL Image Library
#include <SOIL/SOIL.h>

// OpenGL Mathematics
#include <glm/glm.hpp>
#include <glm/gtc/matrix_transform.hpp>
#include <glm/gtc/type_ptr.hpp>

// Assimp
#include <assimp/Importer.hpp>
#include <assimp/scene.h>
#include <assimp/postprocess.h>
Notice that before the include of each file there’s the name of the library. This is because of how we included the headers and how the folders are structured. Take a look at the folder structure of any library and you will understand it.